Thundermaus : Reloaded
(Re-vamping the Thundermaus Ship)
(Re-vamping the Thundermaus Ship)
This is the turbulent story of how I re-designed and constructed the new Thundermaus ship. Aesthetically however, the
final design took forever to assemble. I guess this is where my
troubles really began: From here on in, the more ideas I added the
harder the project became and the longer it took to produce the goods ...
but in some wierd dyslexic geeky anorac way - it was worth it. So here goes the journey I took...
The success of
Thundermaus in 2011, prompted me to look at our props again and try to imagine
if they could be improved. I felt way too much had been skipped over, due to lack of
time. Our cardboard film set for the bridge was a rather flat looking affair and difficult to film decent
angles with. The ship itself was hopeless, merely a round paper lantern from
the pound shop, lacking detail and substance to it. The thing was quite literally
stuck in front of the camera and filmed. The only thing going for the ship was producer Becky Sadlers typographic skills - she painted the name on it, a trick in itself as the paper tissue 'hull' needed to be varnished first before the typex could be applied. 

Overall, the production values on our first attempt were very low indeed. Still saying that, the Button Moon crapness of it all added to the charm but then again, improving on these aspects wouldn’t hurt either.
Right: Chinese Lanterns: The original Thundermaus ship, as used in the 48hr Film Festival 2011

Even Button Moon needed some level of
professionalism to make it look as childlike as poss. But it wasn’t exactly the
look I was heading for, if anything I wanted Red Dwarf meets the Sooty show or
Space 1999 with Teddybears...


Thundermaus: Typography By Becky Sadler

Red Dwarf : Typography by BBC Staff
Ultimatly I wanted higher production values but still retain that hand made feel, that quaintness that is the plastic Airfix model,
flying around on strings . 

But Thundermaus is a long way off reaching anything like that. Take the original Thundermaus space ship for instance: It was so flimsy that it almost disintegrated when I clumsily spilt tea over it. Once, (whilst trying to get it into the boot of a car) the bloody thing blew away in a gust of wind down the street, with me chasing after it !
Space 1999 - Slightly better production values to Thundermaus !

Then I had a job interview in Clanfield for an editor position and got talking to the C.O. about our Thundermaus idea. His initial reaction sounded quite enthusiastic and I thought perhaps he saw the idea the way I did, that is until I showed him what we had actually made. Despite our Thundermaus film was only two minutes long, the C.O. shifted uncomfortably in his chair, whilst his eyes glazed over and about twenty seconds into it, (just as the ship landed) he said:
‘ahem yes, thankyou Mr Adams, I think I’ve
seen quite enough...’
 Describing vintage Dr Who would probably sound terrific
to somebody who has never seen it before but in this day and age of computer
generated imagery, vintage Dr Who is quit laughable (it was laughable then) but
when that level of fakeness is exactly what you want to achieve anyway, such a
thing actually needs a lot of work.
Describing vintage Dr Who would probably sound terrific
to somebody who has never seen it before but in this day and age of computer
generated imagery, vintage Dr Who is quit laughable (it was laughable then) but
when that level of fakeness is exactly what you want to achieve anyway, such a
thing actually needs a lot of work. 
The Original ship with crappy stairs
It
was then I decided we really needed something a bit more substantial. Big
business is big business, no room for crappyness here. In this universe,
special FX have to be one or the other, crap or not crap. So if we are to do
crappy special FX, we better get them
right. Its all academic, signs need to be signified. A homage must look like a
homage. Gerry Anderson, Dr Who, Star Treck, even Red Dwarf all had it down to a
certain imperfect perfection. Look at any Space 1999 episode and you will see
what I mean. 
Space 1999: A Series to aspire to.
There’s something gloriously crap about a real model that a CGI
model simply can never replicate. You can’t replicate crapness with CGI, not
really. You can’t replicate the obvious joins where the glue didn’t quite stick
those bits of plastic together. Look at The Green Slime. Another gem of yesteryear ...

or even that neo classic : Planet of the Vampires...

Both have the production values of a ten year old (but that ten year old was probably nearer to my age) and besides the obvious lack of funding, what allows such ideas to look so bad, (as is nearly always the case) is that they date very easily. Particularly anything pre Star Wars. It is simply unavoidable. Anything before 1977 was still work in progress, awaiting that all in important CGI re-vamp, so to avoid further embarrisment. But such embarrisments as these films, were along the lines of what I had in mind for Thundermaus, while mixing it in with anything from Star Treck to Captain EO...

So with that in mind, I set about re-designing the Thundermaus space ship, with a view to keeping its crapness but somehow making it iconic looking and memorable. My brief was simple; to create a model that was robust enough for filming and could be taken apart easily for maintenance.

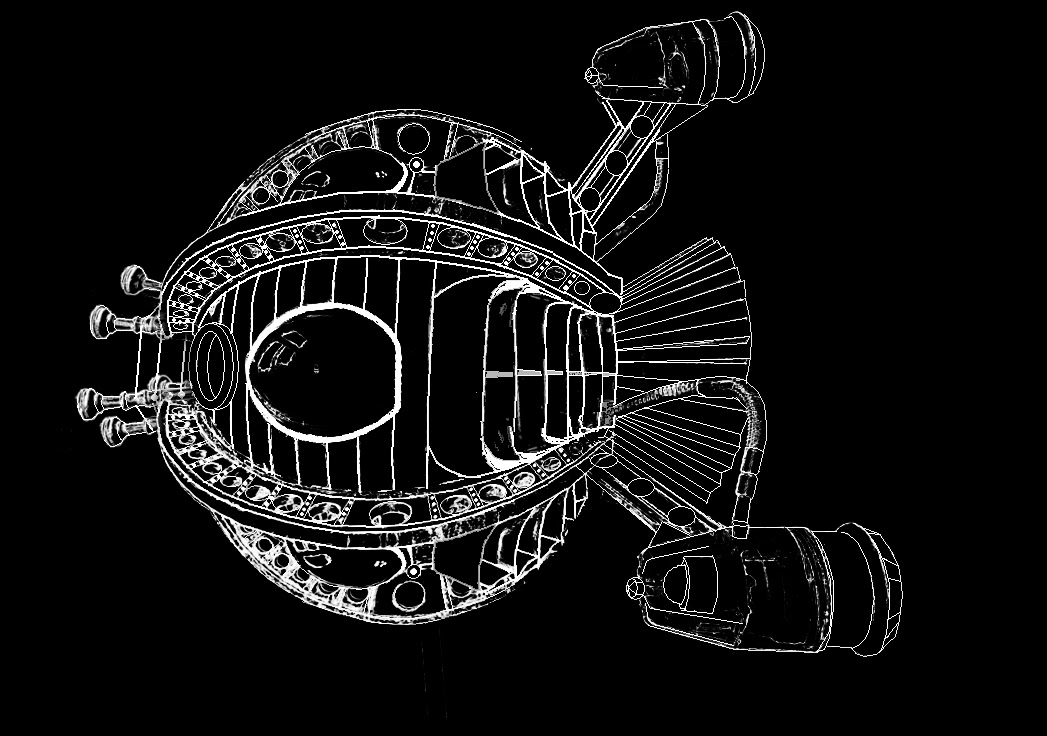
Above : Concept drawing of Thundermaus re-vamp

Thundermaus thrusters - in reality a Screwdriver Set


Above: Thundermaus ship in early stages of re-design
For my proposed idea, I was a little inspired by a collection of
three or four distinct, iconic space ships, but mainly The Liberator
(from Blakes 7) Hg Wells anti-gravity ship (The Cavorite Sphere) and the
mining ship Red
Dwarf .

Above : The Liberator, The Cavorite Sphere and Red Dwarf
As far as the orignal ship was concerned, I wanted to keep the general lampshade look but
enhance it some how with a metal frame. At the time, I had been working on modeling
the Cavorite Sphere from scratch, based on Ray Harryhausens design for First Men In The Moon. It’s a brilliant
design, a simple bronze sphere encased within a thick, rusty interlocking Victorian
girder like cage, accentuated with train buffers and brass porthole windows
riveted to it here and there. It's the epitome Steam Punk . 
Above : Ray Harryhausens design for the cavorite sphere

Left : Concept drawing of Thundermaus ship with Cavorite sphere frame idea.
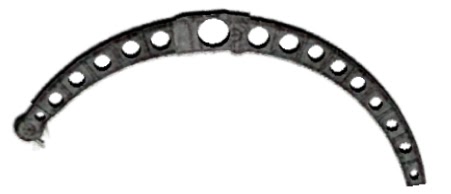
Thundermaus - concept of girder

Thundermaus : Concept drawing with girder development
So for the Thundermaus, I wanted something a
little like that and played around with the idea of using a Cavorite sphere
type of frame work on a tripod array and then stripped it back to a more
simplified version until I settled on the idea of curved victorian like girders with
holes in them...


The fact the Thundermaus is coloured red is another hang
up from Red Dwarf, altho I couldn’t imagine it being any other colour
and decided to mix a little blue and silver with the aesthetics, to break this redness up a bit
more.
Above: assembly of basic components of ship

Above: Ships girders under construction, made of card to minimise weight

Ship with girders fitted
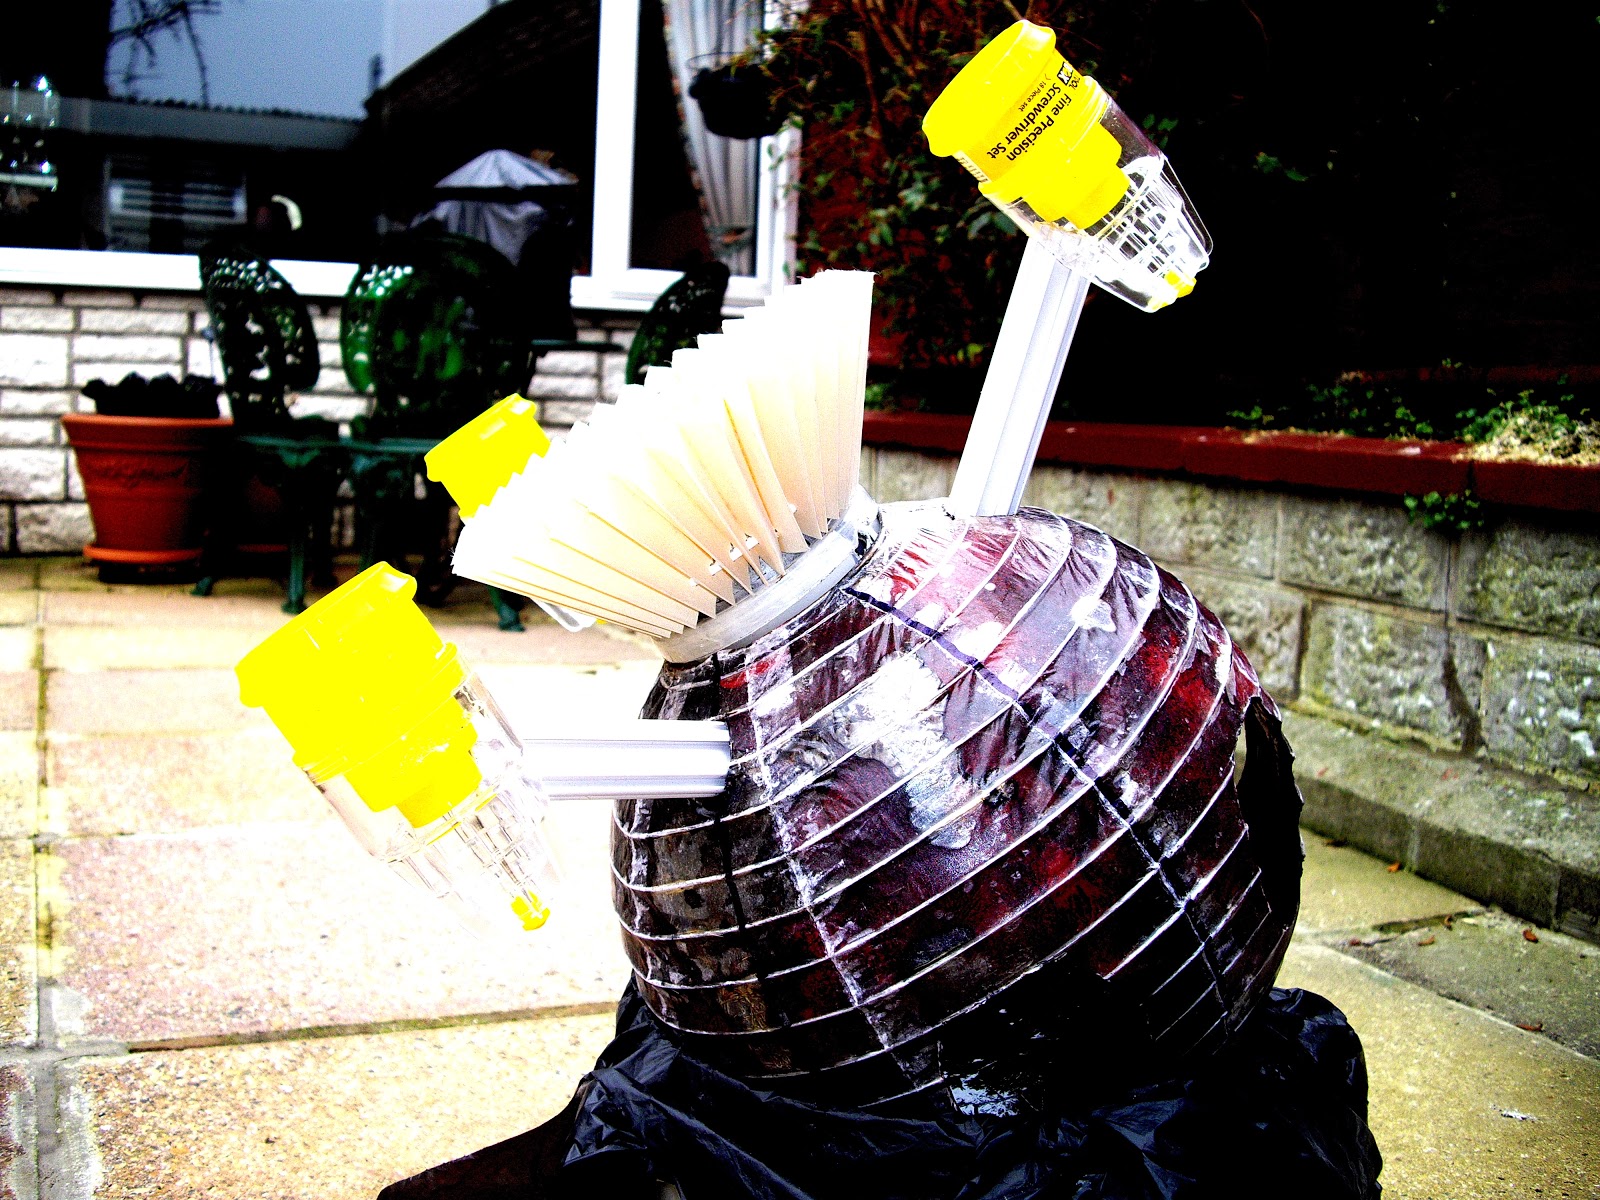

The tripod thruster array is quite obviously an idea from Blakes 7's The Liberator. I figured a little homage would do the ship good. They would also double as handy landing gear...


Rear Booster - based on a pleeted lamp shade and a pot noodle...

Ships bagpipe antennae: in reality chess pieces !
The bagpipe array at the front was inspired a little by the spider antennae
on Red Dwarf, aestheticly, it seemed to make the ship look a little more balanced looking. 

When I got to building the egg windows, it was now Easter time 2012. So
there were a lot of Egg shaped products on the shelves in the pound shops that I could utilise. The windows I ended up using, were originaly the clear packaging that came with these 'mood lights' - egg shaped lights which changed colors. I painted them with clear blue humbrol paint, then the mood eggs were cut in half and applied behind them to make the windows more opaque.

The egg windows were slightly Faberge egg inspired, based on a Black Keys album cover with a similar idea.
It was then a case of inserting the windows but this meant making holes in the paper lantern. When I tried this however, I failed to realise that a paper lantern with six egg shaped holes will lose its shape and collapse...


Once the holes were cut out, I then sprayed the inside with red paint and applied black roofing paint on top of that. This gave the ships dirty reddish effect and accentuates the white wire wrapped around it. Finally, the egg windows were held in place with velcro for easy removal, just in case I needed to access the ships inner workings...

Painting the inside of any model space ship with black paint is common practice. That or reflective material, anything which will keep sources of light from shining through unwanted areas.


The egg windows were slightly Faberge egg inspired, based on a Black Keys album cover with a similar idea.
It was then a case of inserting the windows but this meant making holes in the paper lantern. When I tried this however, I failed to realise that a paper lantern with six egg shaped holes will lose its shape and collapse...

Lantern Carnage: The realisation that Paper is a rubbish medium to make space ships out of...

Phoenix from the Lanterns : Step 1, 2 and 3
Step 1 : Dip paper lantern in water to stretch paper, allow to dry
Step 2: Apply quick dry wood preserver
Step 3: Apply an even coat of resin and fiberglass
Several lanterns later, I resorted to re-enforcing them with fibre glass first (to retain the shape) before making any further holes...
Cutting holes out with drimmel:
Cutting them out was a real pain. Fibreglass is a messy material to cut and creates lots of dust, so I used my mothers back garden to do the job . I used a drimmel wheel cutter and to my surprise, sparks flew out everywhere (The Sparks were due to the white metal wire wrapped all the way around the lantern) By now it was dark and the sparks illuminated the inside of the lantern. God knows what the neighbours must have thought. It was like I was fashioning this thing in the mountains of Mordor...
Once the holes were cut out, I then sprayed the inside with red paint and applied black roofing paint on top of that. This gave the ships dirty reddish effect and accentuates the white wire wrapped around it. Finally, the egg windows were held in place with velcro for easy removal, just in case I needed to access the ships inner workings...

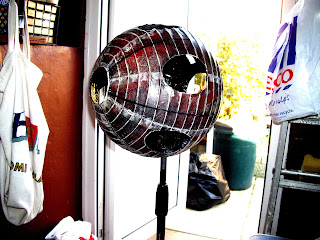
Since the lantern was originaly transparent, blocking
out as much of this with black paint was neccessary, in order that when it came to the interior lighting, the
LED lights would only illuminate the egg windows and nothing else.

Painting the inside of any model space ship with black paint is common practice. That or reflective material, anything which will keep sources of light from shining through unwanted areas.

Right : Ship with metal rod running thru it horizontally - designed to make the ship spin and give more flamboyant Millenium Falcon flight in space...

The Thundermaus - near completion

The Thundermaus- with vents
The final touch
was the vents. Probably the hardest bit of the ship I had to work on. There was
no reference I could really touch upon, other than Tim Burtons Batmobile had similar
vents on its rear, which I always liked.

Making the vents drove me nuts. I must
have gone thru 10 or so variations on the vent idea until I settled on a design
that worked for me...

Talk about overkill but then again, I didn’t want to be
accused of being half assed either (or maybe in my brain somewhere, there is a touch of O.C.D.) Shrugging this aside, I had the idea that the vents would
give the ship a sense of speed but in the end, it sort of made it look like
it had fishes gills.


With all the interior fibre glass and mechano added, the ship was having some serious structural problems due to the increase in weight. Those legs are only made of plastic and not up to too much stress. Still the craft held together. So long as we didnt fluff up our landings, the landing gear would hold out...


Concept drawing with how the vents might look.

Above: protoype vents on ship, made from card

Above: various vents, middle one is designed to hinge down revealing the iris door behind
Oh well, if only I had a 3-D printer which would do all the boring fiddly repetitious bits for me. Oh if only ! Instead I spent something like a month just working
on the bloody vents, endlessly cutting out and folding bits of plastic, untill I had a set of prototypes that I was sort of happy with, which seemed to look good from all angles. 
Above: protoype vents on ship, made from card

Above: various vents, middle one is designed to hinge down revealing the iris door behind

I then thought it would be really cool to have light shining out of the vents but this meant cutting away the panels behind them and shining the light through. 

Above: Mechano re-enforcement
By the time I had put in all these ideas, the ship had so many holes cut out of it, that it was becoming dangerously fragile and I had to re-enforce it with even more fibre glass and then added an
endoskeleton, made up of bits of mechano bolted together (!!!)

Underside of ship with Mechano re-enforcment

With all the interior fibre glass and mechano added, the ship was having some serious structural problems due to the increase in weight. Those legs are only made of plastic and not up to too much stress. Still the craft held together. So long as we didnt fluff up our landings, the landing gear would hold out...

Concept drawing with an exit ramp
It was then that I realised the Thundermaus ship
had no door ! How in space, were these guys supposed to get in and out of the
bloody thing? There are lessons to be learned here, such as planning out your
space craft well in advance of construction but I suppose I figured the entrance could
always be sorted out later. Minyana minyana. Doh !

Thundermaus ship - with lighting
Mulling over this problem, I felt beaming
the crew up and down like Star Treck was a cop out and wanted the ship to (like in some low budget BBC sort of way) actually land and the
crew to physically leave the ship but since I had forgotten to put in an exit, I eventually hit upon the idea of putting in several iris
doors inside the vents, with an extending ramp. The idea being that the vent
would hinge open, a ramp would unfold and then the iris door would open like
E.T’s space ship. For good measure, I also put an iris on the top , just in case of spacewalk scenes
or what ever.


E.T.'s space ship with Iris Door and ramp

Thundermaus space ship with Iris Door and ramp

Above -The exit amps

Above - ship with alcove for Iris door mechanism
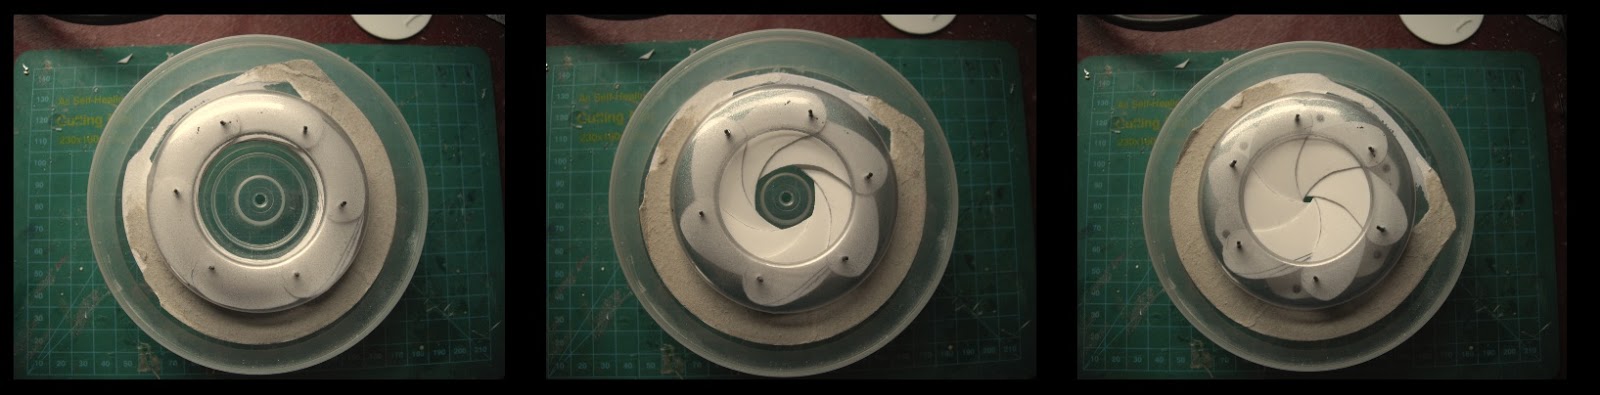
I based my iris door design on a spaghetti measurer from a local
kitchen utensil shop. Unfortunately it wouldnt close completely (which was really annoying) so I had to duplicate the design in plasticard and re-design them slightly to close. Such Iris’s are made up of 6 leaves converging on two rings, turn a ring in one direction and it will either open or close,
the same way a manual camera aperture would. All this began to set me back another couple of
months... 
Above -The exit amps

Above - ship with alcove for Iris door mechanism

Iris Spaghetti measurers - Too bad they dont close all the way...

Iris door - based on Spagetti measurer design

Iris door in topside of ship

iris door for underside
Iris door - based on Spagetti measurer design

Iris door in topside of ship

iris door for underside
My projected deadline was to have the ship ready by March 2012 but there was no way I was going to meet that deadline, not with all the ideas I felt needed to be added to the re-design. By April, my film crew were beggining to ask me 'when would this ship be finished ? It was a question I simply could not answer. What could I say ? I wasnt getting any help. People would say they would do this and do that for me but it never seemed to materialise. From here on in, I had to do all the designing and construction by myself. Nobody else had the time !

Close up of Iris door in Thundermaus ship, complete with unfolding ramp
The ship now looks great, but looking back, it was all overkill really. Every aspect of the ship was like this tho. Every day, I would have to sit down at my lap top, draw out some ideas, spend hours making designs - just for one aspect of the ship ! Wether it was a rocket booster, the antennia, or a stupid light, each aspect probably took 2 or 3 weeks to design and build into the structure - because ultimatley anything I made, had to be maintenance friendly.

Even lighting the ship was another logistical headache to overcome. I needed to work out a way of distributing the light thru the egg windows evenly and came up with the idea of using light bar modules (left) made from angled push lights from the pound shop, wired together and set into cardboard tubes.

These modules would then sit inside the ship held in with velcro.

Left: Ship with lighting array  Above: Front headlight module - made from a strawberry triffle pot !
 Above: Front headlight module - made from a strawberry triffle pot !
Crew with hand held tea lights - probably not the best way to make your space ship look cool...
Nine months
later, I finished the ship barely in time to start the DV Mission 2012.Unfortunatly this meant there was no time left to film it properly and thus the ship was featured very briefly for only a few seconds. Oh the irony !

 Above all, finding a permanent location to work in, proved to be the biggest hurdle, as I had to keep finding new workshops, which kept falling through, until I settled on a space at the back of a market bizzare in Eastney, with no heating and extreme damp!

And So. When it comes to making these things a reality, Thundermaus: The Series is essentially a one man band, with occasional input from a camera crew and actors. Beyond that, it is a long, long slog of designing and implementing the ideas. I’m just a slow worker I guess. Must be the dyslexia.
Well, nobody’s perfect ...